Back in October I received a free sample, the UHU Glue Roller ($6.65)from Glue with UHU. This is a pretty nifty little item, which takes messy permanent glue and turns it into little micro-dots of glue on a tape that you can roll out and apply to.... whatever. I understand that it is good for scrapbooking due to its acid free and solvent free formula, but the application I used it for doesn't require quite as much longevity.
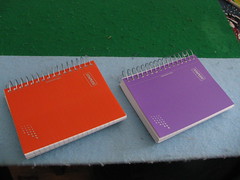
I have some little notebooks sitting around, waiting to be turned into something special, and this particular glue just fit the ticket. I had previously tried using another glue to adhere scrapbook paper to the hard plastic/Vinyl cover of the notebook, and while it was "Adequate", it didn't work quite as well as I had hoped. Then I tried the UHU Glue Roller, and was very pleased with the results.
First I took the coil out, and covered the entire frontpiece with red scrapbook paper.
The paper adhered to the cover quite nicely, and didn't "gape" along the bottom edge.
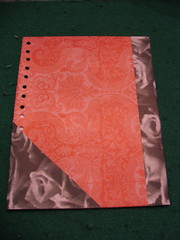
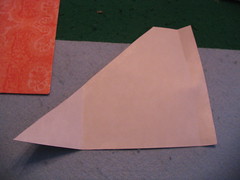
Then I added the contrast, that created a pocket on the inside, as well as adding to interest on the front. This picture shows that piece ready to put on the front cover~
I only had one caveat~ The roller has an 'Adjustment screw" to help with the tension on the tape, and I think there might be a learning curve to using this, as I did have some trouble with the tape doubling up. However, I was still able to use it, and would definitely be happy to use it again!
If you are interested in applying for free UHU samples, and blogging about your projects, be sure to head on over to Glue with UHU around the first of the month, to find out what's new, and request yours!
Blessings~

I have some little notebooks sitting around,
 waiting to be turned into something special, and this particular glue just fit the ticket. I had previously tried using another glue to adhere scrapbook paper to the hard plastic/Vinyl cover of the notebook, and while it was "Adequate", it didn't work quite as well as I had hoped. Then I tried the UHU Glue Roller, and was very pleased with the results.
First I took the coil out, and covered the entire frontpiece with red scrapbook paper.
The paper adhered to the cover quite nicely, and didn't "gape" along the bottom edge.
Then I added the contrast, that created a pocket on the inside, as well as adding to interest on the front. This picture shows that piece ready to put on the front cover~
Here is the front piece before I finished poking holes, and put everything back together~ 
Here is the notebook opened up to the inside

And here is the completed notebook with the embellishment of a heart

The back flap is covered on both sides with that block rose paper. (Sorry, no picture of that...)
Here's another notebook I helped my daughter to make as part of a birthday gift for a friend~

(We used the UHU Glue Roller to help cover the pencil before modge podging it...)

Here is the notebook opened up to the inside

And here is the completed notebook with the embellishment of a heart

The back flap is covered on both sides with that block rose paper. (Sorry, no picture of that...)
Here's another notebook I helped my daughter to make as part of a birthday gift for a friend~

(We used the UHU Glue Roller to help cover the pencil before modge podging it...)
I only had one caveat~ The roller has an 'Adjustment screw" to help with the tension on the tape, and I think there might be a learning curve to using this, as I did have some trouble with the tape doubling up. However, I was still able to use it, and would definitely be happy to use it again!
If you are interested in applying for free UHU samples, and blogging about your projects, be sure to head on over to Glue with UHU around the first of the month, to find out what's new, and request yours!
Blessings~


1 comments:
How cute! I love that! Those would make great gifts for someone as a journal!
Post a Comment